Healthier You

Monday, November 25, 2013

Chocolate Swirl Cheese Cake

http://detoxinista.com/2011/02/raw-chocolate-swirl-cheesecake-bars/

–
Raw Chocolate-Swirl Cheesecake Bars
Makes about 9-12 squares
Chocolate Crust:
1 cup raw pecans
2 Tablespoons cocoa powder
2 Tablespoons pure maple syrup (preferably Grade B)
1 Tablespoon coconut oil
1/2 teaspoon vanilla extract
1/4 teaspoon sea salt
Directions:
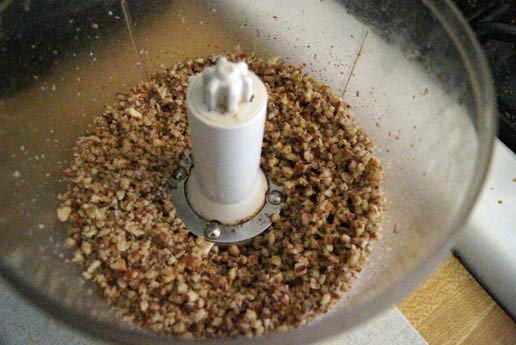
In a mini-food processor (like mine, or a Magic Bullet), process the pecans until they are crumbly:
Be careful not to process too long– you don’t want pecan butter!! Well, maybe you do… but not for this recipe. ;)
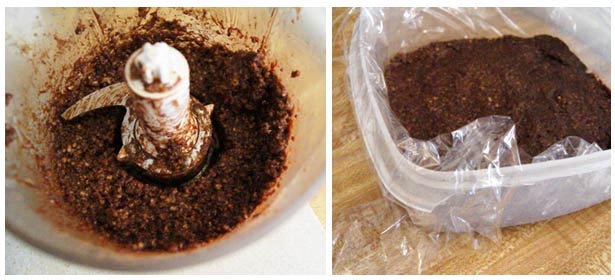
Add in the rest of the crust ingredients, and process until thoroughly combined, scraping down the sides if necessary. Then transfer the crust to a square 6″ Tupperware, lined with plastic-wrap, and press down evenly.
Place the crust in the freezer to set for at least 10 minutes, while you make the cheesecake filling.
Cheesecake filling:
1 cup raw cashews, soaked for at least an hour
1/2 cup zucchini, peeled and chopped
2 1/2 Tablespoons fresh lemon juice
2 Tablespoons coconut oil
1/4 cup honey (or agave, for vegans)
1/2 teaspoon vanilla extract
1/4 teaspoon sea salt
Directions:
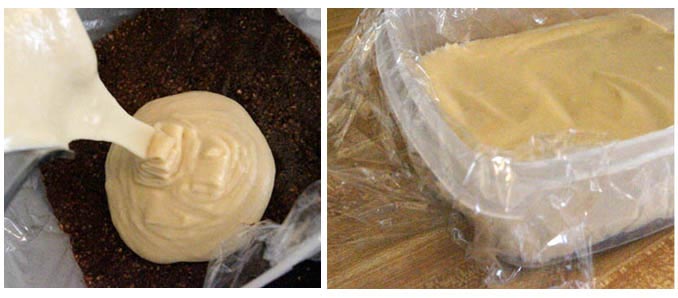
Throw all of the ingredients into a blender (note: if you’re using a high-powered blender, like the Vita-Mix, you can skip soaking the cashews!) and blend until silky smooth. Pour the filling over the chocolate crust and smooth the top, using a spatula:
Now it’s time for the fun part–> adding the chocolate swirls!!!
Chocolate Swirl:
2 Tablespoons cocoa powder
1 Tablespoon pure maple syrup
1 Tablespoon coconut oil, in liquid form
Directions:
Whisk the ingredients together until smooth:
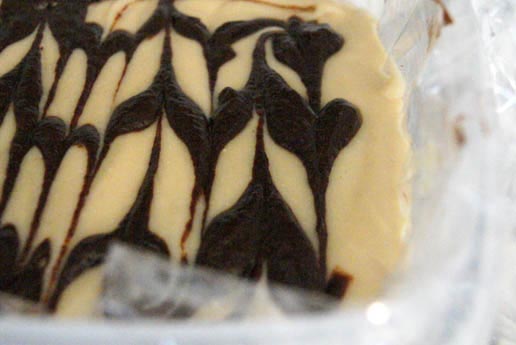
Next, using a spoon, gently pour 3-4 lines across the cheesecake bars:
It’s okay if it’s messy, because you’ll be dragging a knife through those lines next! With a light touch, drag a knife back and forth perpendicularly to the lines you made– creating a marbled look like this:
 
Once your cheesecake bars are “swirled” to your liking, place them in the freezer to set for at least 4 hours. When they are firm, you can slice and serve chilled!
Be sure to store these in the freezer– they will melt quickly at room temperature!
Posted by Healthier You4 at 11:53 AM No comments:
Email ThisBlogThis!Share to XShare to FacebookShare to Pinterest

Flourless Chocolate Cake (Honey Sweetened)

http://detoxinista.com/2012/05/healthier-flourless-chocolate-cake-refined-sugar-free/

Healthier Flourless Chocolate Cake (refined-sugar-free)
makes one 8-inch cake

Ingredients:
4 oz. unsweetened baking chocolate
3 whole eggs
1/2 cup grass-fed butter, or coconut oil
1/4 cup cocoa powder
3/4 cup honey
Directions:
Preheat the oven to 375F, and grease an 8″ spring-form pan generously with coconut oil or butter.
Melt the baking chocolate and butter together, stirring until completely smooth. (You can use a double-boiler for this, but I prefer to simply throw the chocolate into an oven-safe bowl, and melt it in the oven for about 4-5 minutes.)

Combine the melted chocolate/butter with the cocoa powder, honey, and eggs, then whisk well until a smooth batter forms.

Pour the batter into the greased pan, and smooth the top with a spatula.
Bake at 375F for 20-25 minutes, until the center looks firm. Allow to cool in the pan for 15 minutes, then remove the sides (this is why I like using the spring-form pan!) and allow to cool completely before serving.

I recommend cutting and serving small slices… this cake is RICH!


A little goes a long way.
This cake should keep for up to a week… if you don’t eat it all before that.
5.0 from 6 reviews


Print
Healthier Flourless Chocolate Cake
Author: Detoxinista.com
Prep time:  15 mins
Cook time:  25 mins
Total time:  40 mins

Serves: 16
 

A rich, fudge-like cake sure to satisfy any chocolate cravings.
Ingredients
  • 4 oz. unsweetened baking chocolate
  • 3 whole eggs
  • ½ cup grass-fed butter, or coconut oil
  • ¼ cup cocoa powder
  • ¾ cup honey

Instructions
  1. Preheat the oven to 375F, and grease an 8″ spring-form pan generously with coconut oil or butter.
  2. Melt the baking chocolate and butter together, stirring until completely smooth. (You can use a double-boiler for this, but I prefer to simply throw the chocolate into an oven-safe bowl, and melt it in the oven for about 4-5 minutes.)
  3. Combine the melted chocolate/butter with the cocoa powder, honey, and eggs, then whisk well until a smooth batter forms.
  4. Pour the batter into the greased pan, and smooth the top with a spatula.
  5. Bake at 375F for 20-25 minutes, until the center looks firm. Allow to cool in the pan for 15 minutes, then remove the sides (this is why I like using the spring-form pan!) and allow to cool completely before serving.

Notes
This makes a less-sweet, dark chocolate cake. If you’d like it to be a little sweeter, I’d recommend using 70% dark chocolate instead of the unsweetened baking chocolate. ©Detoxinista.com
 
Posted by Healthier You4 at 11:43 AM No comments:
Email ThisBlogThis!Share to XShare to FacebookShare to Pinterest

Pumpkin Recipies

http://www.thebakingbeauties.com/category/this-n-that/pumpkin-recipes
Posted by Healthier You4 at 11:38 AM No comments:
Email ThisBlogThis!Share to XShare to FacebookShare to Pinterest

Honey Sweetened Hot Cocoa

http://www.recipestonourish.com/2011/10/honey-sweetened-hot-chocolate.html?m=1

Honey-Sweetened Hot Chocolate
Sweet, chocolaty and so comforting.


Equipment: Medium-Size Saucepan, Small Bowl

  • 3 tablespoons raw cacao powder
  • 2 tablespoons raw honey (I use local raw clover creamed)
  • 2 teaspoons gluten-free organic vanilla extract
  • 3 cups raw whole milk* (See Resources)

1.     Add milk to a medium-size saucepan and heat over low heat for about 7 minutes or until desired temperature.  
2.    In a small bowl, combine cacao powder, honey and vanilla.  Stir until it makes a paste. 
 
3.    Add cacao mixture to the warm milk, stir until cacao mixture has completely dissolved. 


4.    Serve immediately.


Yield: Makes about 3 servings.
Posted by Healthier You4 at 11:36 AM No comments:
Email ThisBlogThis!Share to XShare to FacebookShare to Pinterest

Pumpkin Custard


http://www.grassfedgirl.com/pumpkin-custard/
 
  • Low Carb Paleo Pumpkin Custard

    November 21, 2012 by Caitlin Weeks


    (Use all organic ingredients whenever possible)
     Ingredients:
    1 cup Organic Canned Pumpkin
    1 tsp cinnamon
    1/4 tsp ground ginger
    Pinch of Real Salt
    2 pinches of grated nutmeg
    2 organic eggs
    1/4 cup grade B maple syrup optional- leave out for a savory version or for a 21-Day Sugar Detox friendly version
    (or my version: Add 8-10 drops of liquid Stevia  for a lower carb treat)
    1 tsp vanilla extract
    1 cup Full Fat Canned Coconut Milk (do not use boxed b/c there is not enough fat)

    Directions:

    Pre-heat the oven to 350 degrees. Combine pumpkin and all spices in one bowl.
    In a smaller bowl, beat the eggs lightly then whisk in the maple syrup, vanilla and coconut milk. Whisk the egg mixture into the pumpkin mixture until well combined.
    Pour the custard into 6- 1/2 cup ramekins or one medium ceramic baking dish. Place the ramekins in a baking pan and add enough water to the dish to come up 2″ high around the ramekins or ceramic baking dish. Carefully place in the oven and bake for 60 minutes or until a knife inserted into the center of the custard comes out clean
     
    Posted by Healthier You4 at 11:33 AM No comments:
    Email ThisBlogThis!Share to XShare to FacebookShare to Pinterest

    Zucchini Boats

    http://www.prouditaliancook.com/2010/05/tiny-tomatoes-big-taste.html


    Slice the zucchini in half. Slice off the bottom to keep in stable. Brush with olive oil and top with garlic or garlic powder. Top with sliced tomatoes, salt and pepper to taste. Use mozzarella cheese, Parmesan cheese or mixed blend.. Bake 375 for 20 to 30 minutes until soft.
    Posted by Healthier You4 at 11:27 AM No comments:
    Email ThisBlogThis!Share to XShare to FacebookShare to Pinterest

    Gluten Free Apple Harvest Muffins

    http://www.thesimplemoms.com/2013/11/a-simple-real-food-recipe-gluten-free-apple-harvest-muffins-2.html


    a simple real food recipe :: gluten free apple harvest muffins


    a simple real food recipe :: gluten free apple harvest muffins
     
    Print

    Author: Renee – www.theSIMPLEmoms.com

    Ingredients
    • ¼ cup whole milk or whole coconut milk
    • ⅓ cup melted butter or coconut oil
    • ¼ cup sucanat or pure cane sugar (I think honey could work too)
    • 2 eggs (if you are egg free go for an egg replacer)
    • Juice of 1 lemon
    • 1 cup brown rice flour
    • 1 cup tapioca flour
    • ½ cup sorghum flour
    • 2 tsp aluminum free baking powder
    • ¼ tsp baking soda
    • ¼ tsp sea salt
    • 1 TB cinnamon
    • ½ tsp ground all spice
    • 2 medium apples, finely chopped (I buzz them in my food processor)

    Instructions
    1. Blend the milk, butter, sugar, eggs, and lemon with a hand beater until well combined.
    2. Add the flours, baking powder, baking soda, salt, cinnamon, and all spice, and blend through with the beaters. The batter is a bit dry but the apples bring in a lot of moisture once added and baked through.
    3. Fold in the chopped apples with a spatula.
    4. Bake in silicone cups or a buttered muffin tin at 350 degrees for 35 minutes. Check around the 30 minute mark in case our ovens run different.
    Posted by Healthier You4 at 11:23 AM No comments:
    Email ThisBlogThis!Share to XShare to FacebookShare to Pinterest
    Older Posts Home
    Subscribe to: Posts (Atom)

    Blog Archive

    • ▼  2013 (29)
      • ▼  November (9)
        • Chocolate Swirl Cheese Cake
        • Flourless Chocolate Cake (Honey Sweetened)
        • Pumpkin Recipies
        • Honey Sweetened Hot Cocoa
        • Pumpkin Custard
        • Zucchini Boats
        • Gluten Free Apple Harvest Muffins
        • Gluten Free Pumpkin Pie
        • Almond Flour Cinnamon Rolls
      • ►  April (9)
      • ►  March (2)
      • ►  February (9)
    • ►  2012 (51)
      • ►  April (7)
      • ►  March (44)

    About Me

    Healthier You4
    View my complete profile
    Watermark theme. Powered by Blogger.